Showing posts with label Novice. Show all posts

Tuesday, 29 April 2025

Cheese & Onion Crispbakes

Hello

안녕하세요

(Annyeonghaseyo)

こんにちは

(Konnichiwa)

你好

(Ni Hao)


It's time to share another recipe from one of the Pinch of Nom recipe books. These Cheese & Onion Crispbakes can be found in the Everyday Light recipe book under Batch Cook.

Let's get cooking!


Ingredients:
500g potatoes, peeled and chopped
120g wholemeal bread
2 medium eggs
80g reduced-fat cheddar, grated
1 tsp mustard powder
6 spring onions, trimmed and thinly sliced
sea salt and freshly ground black pepper
low-calorie cooking spray

Start off by pre-heating your oven to 170C/150C Fan/Gas Mark 3. Then line a baking tray with greaseproof paper.

Cook the potatoes in a pan of boiling salted water for 20 minutes, or until a knife slides easily into the centre of each potato. Then drain well, return to the pan and mash.

Using a food processor or a mini electric chopper, blitz the wholemeal bread into fine crumbs. Place the breadcrumbs into a shallow dish.

Whisk the eggs in a bowl and set to one side.

Add the cheese, mustard powder and spring onions to the mashed potatoes and mix well. Season to taste.

Split the mashed potato mix into four. Shape each quarter into a large burger.

Carefully dip each burger into the egg, and then into the breadcrumbs, coating each side.
Place on the baking tray and repeat to make 4 burgers in total.
Spray each crispbake with cooking spray and place in the oven for 25 minutes, turning halfway and spraying with cooking spray again.

The crispbakes should be golden and crisp when cooked.
Once cooked, serve and enjoy.


I absolutely love this dish. 
They're really easy and simple to make.
The flavours work well together and even Skye seemed to be a fan of the crispbakes. 
I served them with mini corn on the cobs, but I think I'd also add some salad next time to add a little colour to the dish.

If you're interested in any of Pinch of Nom's recipe's then you can buy the recipe books in all major supermarkets as well as online retailers Waterstones and Amazon.

See you soon!


안녕
(Annyeong)
さようなら
(Sayonara)
再见
(ZaiJian)
Bye

Tuesday, 14 May 2024

Longevity Noodles

Hello

안녕하세요

(Annyeonghaseyo)

こんにちは

(Konnichiwa)

你好

(Ni Hao)


For the past few years, if we're able to celebrate, I cook food that's perfect for the Chinese New Year aka Lunar New Year and this year I decided to make us some longevity noodles. This recipe is also known as long life noodles and symbolize longevity. They're used for celebrations such as weddings, birthdays, lunar new year as well as a new baby.
I came across this recipe when looking for a new recipe to try.

Let's get cooking!

Ingredients:
3 quarts water
340g dry Yi Mein noodles
1/8 tsp sugar
1/4 tsp salt
1 tbsp hot water
2 tsp regular soy sauce
2 tsp dark soy sauce
2 tbsp oyster sauce
1/2 tsp sesame oil
Freshly ground white pepper
3-4 tbsp vegetable oil
5 shitake mushrooms
225g Chinese chives

Start off boiling the 3 quarts water in a large wok or pot to pre-cook your noodles for 3-4 minutes. I wasn't able to get to an Asian supermarket to get the proper noodles so I used medium egg noodles. You want the noodles to be al dente, so once ready drain and set aside.

Next dissolve the sugar and salt in the 1 tbsp of hot water, then add the regular soy sauce, dark soy sauce, oyster sauce, sesame oil and white pepper.
Then stir until combined.


Next heat a wok until just smoking and spread 2 tbsp's of oil around.
Add the mushrooms and the chives and stir-fry for 30 seconds. Sadly I couldn't get my hands on any Chinese chives so I used normal dried chives. If the mushrooms look dry then add more oil.

Add the noodles and stir-fry for 20 seconds, if the noodles have gone cold, cook a little longer to heat them back up.

Next spread the prepared sauce mixture evenly over the noodles and stir-fry everything together for 1 minute, or until the mixture is evenly distributed.
Remember to mix gently.
Add the remaining chives.


Now you're ready to serve.


I'd happily cook us this again, we both enjoyed it, next time though I'd love to make sure that I had all the proper ingredients needed to make it more authentic.
It's really is an quick to cook too, which is perfect for anyone that's a novice when it comes to cooking.

If you would like to follow the original recipe, then head over to The Woks of Life Longevity Noodles recipe page. There you will see more in depth steps of the recipe as more on the dish itself.

See you soon!


안녕
(Annyeong)
さようなら
(Sayonara)
再见
(ZaiJian)
Bye

Tuesday, 25 July 2023

Crisp Chinese Pork Belly

Hello

안녕하세요

(Annyeonghaseyo)

こんにちは

(Konnichiwa)

你好

(Ni Hao)


I love pork belly and back in 2021, I cooked Char Siu to celebrate the Lunar New Year and this year, I decided on cooking pork belly again to celebrate the Lunar New Year. This time I cooked the Crisp Chinese Pork Belly from the BBC Good Food website.

Let's get cooking!

Ingredients
500g pork belly slices
2 tsp Chinese five-spice powder.
Dipping Sauce
4 tbsp soy sauce
Small knob fresh root ginger, grated
1 tbsp Thai sweet chilli
1 spring onion, finely chopped
1 Pak Choi, quartered
160g basmati rice

Rub the pork belly slices with the five-spice powder and 1 tsp fine sea salt, then uncovered for about 2 hours.


Preheat your oven to 200C/180C Fan/Gas Mark 6.
Place the pork belly strips in the oven and cook for around 45 minutes.

While the pork belly cooks, you can make your dipping sauce.

In a bowl, mix together the soy sauce, ginger, Thai sweet chilli sauce and spring onion with 2 tbsp of water.


Also while your pork belly is cooking, you can boil some rice, which I boil for 15 minutes on a low heat, as well as frying Pak Choi in butter for about 5-7 minutes, 2-3 minutes on each flat side and 1 minute on the back.

Once everything is cooked, you're ready to serve and enjoy.


I loved this dish, it was really nice and full of flavour, even Skye seemed to be a fan.
It was really easy to cook, so perfect for any novice cook, there isn't too much time to prepare and cook everything as most items can be placed to cook on their own like the rice and pork belly, meaning you're not standing over a hot pan for ages.
Even the dipping sauce is quick and easy to make.

If you would like to follow the original recipe I took this dish from, then head over to the BBC's Good Food Crisp Chinese Pork recipe page. There you will see the changes I made.

See you soon!


안녕
(Annyeong)
さようなら
(Sayonara)
再见
(ZaiJian)
Bye

Tuesday, 9 November 2021

Char Siu aka BBQ Pork

Hello

안녕하세요

(Annyeonghaseyo)

こんにちは

(Konnichiwa)

你好

(Ni Hao)


Back in February it was Lunar New Year aka Chinese New Year and I wanted to do something for me and Skye to celebrate it too, so I hunted online for Chinese recipe's and decided on making Char Siu.

Let's get cooking!

Ingredients:
700g rindless pork belly
For The Marinade:
4 garlic cloves, finely chopped
Thumb-sized piece ginger, peeled and finely chopped
4 tbsp tomato ketchup
4 tbsp hoisin sauce
4 tbsp golden caster sugar
2 tbsp dark soy sauce
2 tbsp rice vinegar
2 tbsp sunflower oil

Mix together all your ingredients for the marinade and leave to one side.

Next put your pork belly into a roasting tin and then pour over the marinade.

Cover and chill them overnight, I didn't chill mine overnight as I didn't look at the recipe properly until I was ready to cook, I chilled them for 30-60 minutes.

Heat your oven to 160C/Fan 140C/Gas Mark 3 and cover the tin with foil and cook for 3 1/2 hours, basing every hour.
Increase the temperature to 180C/Fan 160C/Gas Mark 4, remove the foil, baste the pork and continue to cook for a further 45 minutes until it's beginning to caramelise around the edges.

Remove the pork from the tin and set aside to rest for 20 minutes.
Meanwhile, spoon away any fat from the tin and transfer the sauce to a small pan.
Slice the pork, and pop back into the tin.

Warm the sauce in the pan, then pour over the meat and toss everything together.
Serve however you like.

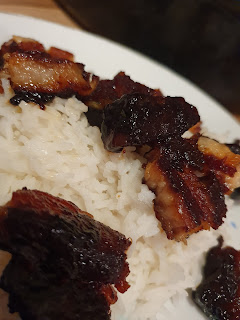
This was the first time I've had pork belly and I really enjoyed it, as you can see, I served ours with rice and it worked really well together.
I'd happily cook this again, it was really tasty and it practically melted in the mouth, I'd definitely make more of the marinade next time round as for me it seemed to cook away before I could make any sauce out of it.
It was really easy and simple to cook and I think it would be easy for any novice cook.

If you want to give the recipe I followed a once over, then head over to the BBC's Good Food Char Siu (BBQ Pork) recipe page.

See you soon!


안녕
(Annyeong)
さようなら
(Sayonara)
再见
(ZaiJian)
Bye